
Tag: Tutorials
Creating a Stereographic Projection in Photoshop
Posted on Categories Digital art, Photoshop, TutorialsSeveral years ago, I came across a way to create cool and unique pieces of art from a photograph in Photoshop. This type of photograph is known as a stereographic projection or “little planet” and, while you don’t see too many people doing it anymore, it seems like it was kind of popular a few years ago. I made a few of these back then, and since I’ve always liked them I’ve recently started making them again.
To make this kind of art is actually pretty simple and requires only a couple of things: a great photograph and a copy of Adobe Photoshop or a similar image-editing program. The best stereographic projections use a type of picture called a 360-degree panorama. This means that the edge of one side of the panorama could be placed next to the opposite edge of the panorama and the two sides would form a continuous scene. These types of pictures are often created by standing in one place and taking continuous photographs while panning the camera in a 360-degree circle, then stitching the photos together in Photoshop or a similar program. Many smartphone cameras now have a panorama feature that makes this easier.
So what do you do if you can’t get a 360-degree panoramic photograph? There are two options: either fake it by editing the image you have, or mirror the image. I have done both, and both options can provide great results.
Faking It
First, I want to show you how to fake it. I’ll use a copy of my photograph, Hovenweep, taken at Hovenweep National Monument.

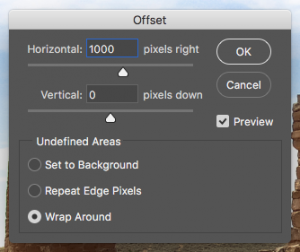
After opening the photograph in Photoshop, I will go to the “Filter” menu, scroll down to “Other,” and choose “Offset…” from the pop-out menu. In the “Horizontal” text field in the dialog box that pops up, I will type “1000” and click the “OK” button. My image will now look like this:
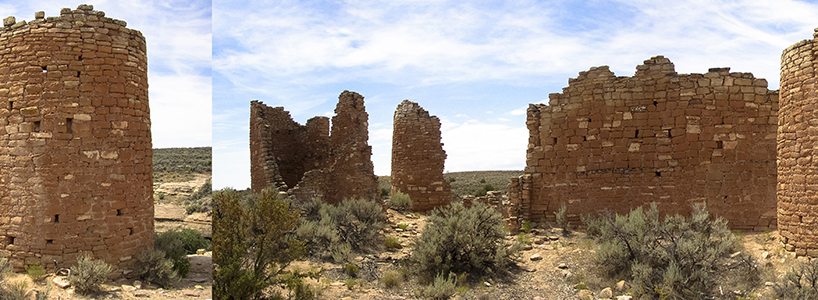
I can now use the Clone Stamp tool to replace areas of the image along the seam so that the offset sides flow into each other without a noticeable difference. Since we are creating a stereographic projection the seam doesn’t have to be perfect, but I will still make it look really good. Once I am finished with that, my image will look like this:
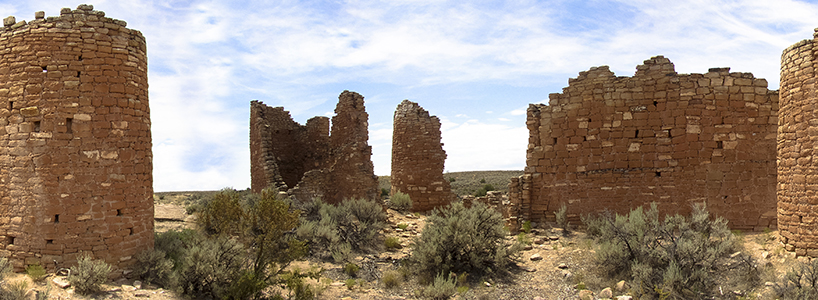
You can still see a couple of places where I could have tried to make it look better, but it will be fine in the final result. Now that I have erased the seam, I will go to the “Image” menu, scroll down to “Image Rotation,” and choose “180°.” Back in the “Filter” menu, I will scroll down to “Distort,” and choose “Polar Coordinates…” In the dialog box, make sure the “Rectangluar to Polar” radio button in selected and click “OK.” My image will now look like this:

The last step is to resize the image so that is a square. Some people do this step right after using the Clone Stamp tool, but I prefer to do it last. When I do it earlier in the process, I occasionally get weird artifacts in my final image. To complete this step, I will go to the “Image” menu again and choose “Image Size.” In the dialog box, I will make sure the “Resample” check box is selected and the link icon between Width and Height is not selected. I will choose “Pixels” from the drop down menu next to Width. Then I will change the value in the text box next to Width to match the value in the text box next to Height, and click “OK.”
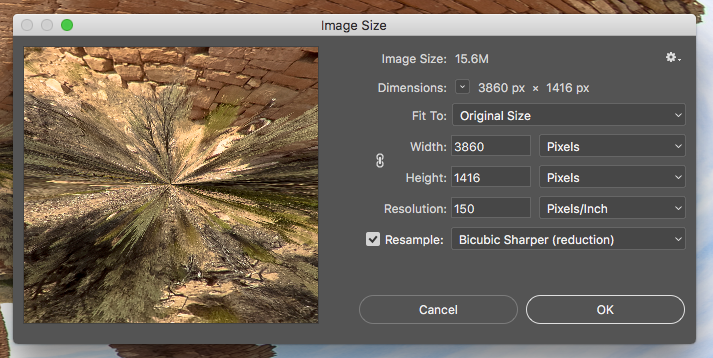
My final image looks like this:
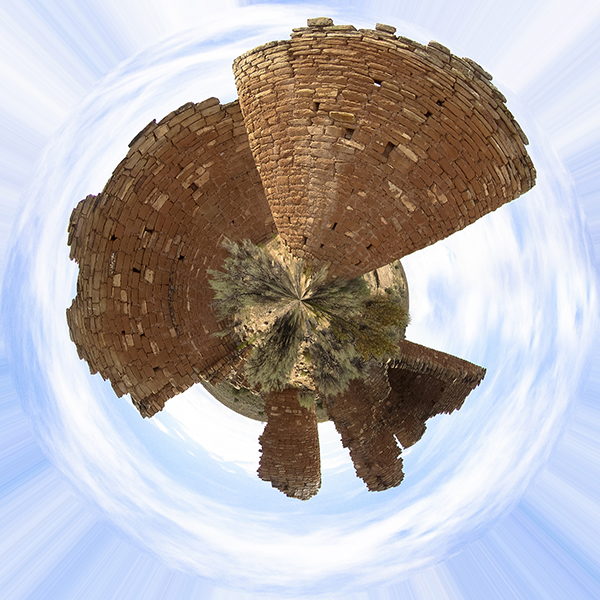
Although not perfect, my seam is now not even visible. It’s a little different from my first version because the Offset value in my first version was different, but that’s how it’s done!
Mirroring
For this example, I will use a different image. I’ll open up a copy of my photograph Cottonwood Creek in Photoshop. The first thing I will do is go to the Layers panel, click the lock icon on the Background layer, right-click on the layer, and choose “Duplicate Layer.” I now have two layers, each with the Cottonwood Creek image.
From the “Image” menu, I will now choose “Canvas Size.” In the dropdown box next to Width, I will choose “Percent.” Then in the text field next to Width, I will change “100” to “200” and click “OK.” This will double the width of the canvas while keeping the height the same.
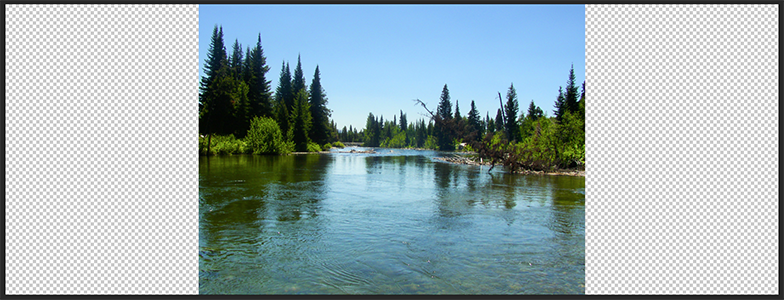
Using the Selection Tool, I will drag one layer clear to the right of the canvas and drag the other layer clear to the left of the canvas. Then, with just one layer selected, I will go the “Edit” menu, scroll down to “Transform,” and choose “Flip Horizontal.” This creates a mirrored landscape and my image now looks like this:

With the top layer selected, I will now press “CMD+E” (Mac) or “CTRL+E” (Windows) to merge the two layers, and follow the steps I took above to rotate the image, map to polar coordinates, and resize to a square. My final image will look like this:
That’s all there is to it! With a nice photograph and a decent image-editing program anyone can create a stereographic projection.
Flash Basics Tutorial #3: Creating 3d Text
Posted on Categories Flash, Flash Basics Video Tutorials, Tutorials, Video TutorialsHow to create 3d looking text.
https://www.youtube.com/watch?v=gsIwH3LZiq4
In this tutorial, I demonstrate how to create text and make it look 3d.
Concepts learned:
- Breaking Apart Objects
- Changing Fill Colors
- Copying and Pasting
- Snapping
- Using the Gradient Transform Tool
- Using the Line Tool
- Using the Text Tool
- Using the Zoom Tool
- Using Undo
- Working with Text
- Working with Gradients
Flash Basics Tutorial #2: Making the Ball Bounce Look Real
Posted on Categories Flash, Flash Basics Video Tutorials, Tutorials, Video TutorialsPart II of Creating a Bouncing Ball.
https://www.youtube.com/watch?v=rmHNh8hVMyU
In this tutorial, I demonstrate how to make the bouncing ball more realistic looking.
Concepts learned:
- Moving Through the Timeline
- Entering Keyframes
- Easing In/Out
- Demonstrating Object Materials
- Using the Free Transform Tool
To create the bouncing ball, please watch Part I of this tutorial: Flash Basics Tutorial #1: Creating a Bouncing Ball
Or download the finished Part I file here.
Flash Basics Tutorial #1: Creating a Bouncing Ball
Posted on Categories Flash, Flash Basics Video Tutorials, Tutorials, Video TutorialsThe first in my new series of Flash tutorials is now live on YouTube. Just click the video or the link below the video to watch it.
https://www.youtube.com/watch?v=2S9BXYiP9Tc
In this tutorial, I demonstrate how to create a bouncing ball.
Concepts learned:
- Using the Oval Tool and Line Tool
- Using the Color Palette
- Creating Symbols
- Inserting Frames and Keyframes
- Using Guide Layers
- Creating Classic Tweens
Flash Basics Video Tutorials
Posted on Categories Miscellaneous2 Comments on Flash Basics Video TutorialsI filmed a short tutorial earlier today about some of the basics of Flash. It’s the first in a planned series of Flash basics video tutorials. The videos will be all about really simple things that can be done in Flash, basically tailored to the absolute beginner. The first one is less than ten minutes long and goes over how to make a bouncing ball in Flash. It should be edited in the next few days, and then I will post it on here and on YouTube.
Adding ActionScript to Multiple Instances
Posted on Categories ActionScript, Flash, TutorialsI wrote a small snippet of ActionScript 2.0 the other day that I was quite proud of. It actually isn’t a very complicated block of code, but I was having trouble making a movieclip do what I wanted so I was quite pleased when I finally got it to work.
Here was my problem:
I had a movieclip, twenty-four frames long, with twenty-three buttons inside. When the mouse moved over each button, the movieclip was supposed to go to a different frame. I didn’t want to code each button individually because that can be tedious, so I employed a method I have often used to add the same code to multiple buttons. First I gave the timeline a name by assigning it to a variable:
var menus:MovieClip = this;
My buttons inside the movieclip were named btn1 through btn23, so I then created a for statement like so:
for (var i=1; i< =23; i++) {
t = menus[“btn”+i];
t.onRollOver = function() {
gotoAndStop(i+1);
}
t.onRollOut = function() {
gotoAndStop(1);
}
}
Using the temporary variables t and i, I was able to assign onRollOver and onRollOut functions to each button. The code actually worked really well when the mouse rolled off the buttons, but when the mouse rolled over the buttons, the movieclip always went to Frame 24 (23 + 1), no matter which button it was over. Obviously, this wasn’t going to work.
I tried several things to make the code work, and had no luck. For some reason, whenever I used the i variable in referencing the frame to go to, it only registered as being equal to 23. I had to figure out a way to capture the value of i at each iteration. Then it occured to me. Since i wasn’t working, maybe I could reference the object directly, using the instance name to tell the movieclip which frame to go to. That was easy enough to do using this._name, but I still had the problem of getting rid of the btn part of the instance names. That was when I remembered substring. I rewrote my code to convert the substring of each instance name to an integer, added 1, and it worked perfectly. My code now looked like this:
var menus:MovieClip = this;
for (var i=1; i < =23; i++) {
t = menus[“btn”+i];
t.onRollOver = function() {
gotoAndStop(int(substring(this._name, 4, this._name.length)) + 1);
}
t.onRollOut = function() {
gotoAndStop(1);
}
}
Creating a Basic Web Page
Posted on Categories HTML and XHTML, TutorialsThis tutorial is designed for Web design newbies, to instruct in the creation of a simple Web page. The file created in this tutorial will be used in future tutorials.
The first thing to know about Web site creation is that every Web page requires four things. These four things are an opening <html> tag, an opening <body> tag, a closing </body> tag, and a closing </html> tag. Actually, a web page will open just fine in a browser without any of these elements, but these are the four basic tags a Web page should have. The markup for a basic Web page looks like this:
<body>
</body>
</html>
Earlier, I mentioned the word ‘tag’. A tag is an HTML formatting element used to tell the browser how to format and display the information contained in the Web page. Most tags come in pairs, hence the need for an opening <html> tag AND a closing </html> tag. Exceptions to this rule include the line break tag, <br />, and the image tag, <image src=”someImage.jpg” />. Information that you wish to be formatted with a certain tag is placed between the opening and closing tags.
Let’s begin by creating the basic Web page mentioned earlier. To create the file, you will need an HTML or text editor. Notepad (Windows) works well, or you can also get software designed specifically for Web site creation. I prefer Adobe Dreamweaver, but if you want an inexpensive program the free tool HTML-Kit works well also. Many applications will automatically added things like the tags mentioned earlier, but in the interest of being thorough we’ll add everything manually.
Start with a blank document and save it as “index.html”. When a browser visits a Web address, the file it looks for is the file named index. If it is unable to find this file, the browser will display a file tree of the files in the directory on the Web server related to that Web address. Since you usually will not want users to be able to access your file tree, it is a good idea to place a file named index.html in every folder that will be visible to the Web. There are also other methods to prevent the file tree from showing, but this tutorial isn’t meant to be that exhaustive.
Now that your document is saved, we’re going to start adding things. The first thing we want to add to the blank page is the Document Type Definition (DTD) or doctype. Strictly speaking, the doctype is not required to create a Web page, but it IS required to create a well-formed Web page. The World Wide Web Consortium (W3C) defines several doctypes, but the one we will use for this example is XHTML 1.0 Transitional. Using the Transitional doctype allows us to not be as strict in our markup.
So now that we’ve added the doctype, our document should look just like this:
“https://www.w3.org/TR/xhtml1/DTD/xhtml1-transitional.dtd”>
Next, we add the opening <html> tag and a new tag called the <head> tag. The document head is a place where information is stored that will not be displayed on the actual Web page. There are a lot of different things that can go in the head, but the only thing we want to put for now is the Web page’s title. So we add an opening <title> tag, then the page title. We’ll call this page “My First Web Page.” Then we add a closing </title> tag, a closing </head> tag, and an opening <body> tag. Our markup should now look like this:
“https://www.w3.org/TR/xhtml1/DTD/xhtml1-transitional.dtd”>
<html>
<head>
<title>My First Web Page</title>
</head>
<body>
Once we have that, we just need to add some content to our page and close the <head> and <body> tags. Let’s add a paragraph that reads “I am learning to build Web sites and this is my first Web page.” To add a paragraph, we use another special tag, the <p> tag. So now we type: <p>I am learning to build Web sites and this is my first Web page.</p>, then type a closing </body> tag and a closing </html> tag. Your page should now look like this:
“https://www.w3.org/TR/xhtml1/DTD/xhtml1-transitional.dtd”>
<html>
<head>
<title>My First Web Page</title>
</head>
<body>
<p>I am learning to build Web sites and this is my first Web page.</p>
</body>
</head>
Now, just save your document and open it in a Web browser. Congratulations! You now know how to build a basic Web page.
Changing Web Page Items Using JavaScript
Posted on Categories JavaScript, TutorialsI recently had a client who wanted a page with a SWF movie that could be changed to a different SWF by clicking on a button on the page. A while back, I did a project where the user could click a link and change the source of an image on the page using JavaScript, but changing an entire SWF seemed a little more difficult. The code to change the image to a different image looked like this:
<image id=”imagetochange” src=”pic1.jpg”>
<a href=”#” onclick=”imagetochange.src=’pic2.jpg'”>Change image</a>
This code was simple enough, so I tried modifying it to change the source of the SWF when I clicked the link. My code now looked like this:
<object id=”changemovie” type=”application/x-shockwave-flash” data=”flashmovie1.swf” width=”640″ height=”400″>
<param id=”changethis” name=”movie” value=”flashmovie1.swf” />
</object><a href=”#” onclick=”changemovie.data=’flashmovie2.swf’; changethis.value=’flashmovie2.swf’;”>Change movie</a>
This worked in some browsers but it didn’t work in others, so I was forced to come up with a different solution. After some research, I was reminded of two JavaScript items that eventually made the whole thing possible: getElementById and innerHTML. After some tweaking, I ended up with a code that looked something like this:
<script type=”text/javascript”>
function changeText() {
document.getElementById(‘flashitem’).innerHTML = ‘<object type=”application/x-shockwave-flash” data=”flashmovie2.swf” width=”640″ height=”400″> <param name=”movie” value=”flashmovie2.swf” /> </object>’;
}
<div id=”flashitem”>
<object type=”application/x-shockwave-flash” data=”flashmovie1.swf” width=”640″ height=”400″>
<param name=”movie” value=”flashmovie1.swf” />
</object>
</div>
<a href=”#” onclick=”changeText();”>Change movie</a>
First, I created a JavaScript function called changeText(). Inside the function, I placed “document.getElementByID(‘flashitem’)”. This calls a function which searches the page for an element with the id of “flashitem”. Then I added “.innerHTML”, which tells the program that we are doing something with the innerHTML property of the specified element. I then set the value of the innerHTML property to the code for the SWF object I wanted to replace the original SWF, and closed the changeText() function. Now when the function is called, it will change the HTML inside a div with the id of “flashitem” to the code to place the new SWF on the Web page. Now I just needed to create the div and the link.
I created a new div with the code for the original SWF object inside and gave the div an id of “flashitem”. Outside the div, I then created a link to call the function changeText(), and it worked perfectly.
Variables and Data Types in PHP
Posted on Categories PHP, TutorialsContinued from Understanding Variables:
PHP variables must also conform to a set of rules. Variable names must start with a dollar sign. They can contain any combination of strings, numbers, and underscores, but the first character after the dollar sign cannot be a number. PHP variables are also case-sensitive.
PHP variables don’t need an initial value when they are created, and they don’t need to be declared a specific data type either.
PHP has several built-in data types:
- boolean – a data type with only two possible values: true or false
- integer – any positive or negative whole number, or a zero
- float – numbers that are too large or too small to be represented as integers
- string – a series of alphanumeric characters, numbers, and punctuation marks
- array – a data type which can hold several different values
- object – built-in or user-defined classes of data; a collection of properties or attributes
- resource – a variable holding a reference to an external resource, like a MySQL database
- NULL – a special data value that has no value and means nothing; not the same as zero
When using integers, a leading 0 ( zero ) is used to specify that the integer is octal, and a leading 0x or 0X is used to specify hexadecimal. A floating point number can contain either a decimal or an “e” to represent “ten to the power of” in scientific notation, or both.
Note: ActionScript and JavaScript also use arrays, but they aren’t listed as a basic data type in the official documentation, as far as I’ve been able to discover, while arrays are listed as one of the eight main data types supported by PHP. While most of us just use arrays without considering whether they are a data type or not, I have endeavored to follow the various documentation in these articles. I apologize for any confusion this may cause.
Variables and Data Types in JavaScript
Posted on Categories JavaScript, TutorialsContinued from Understanding Variables:
Like other languages, JavaScript variables must also conform to certain rules. Variable names must start with either a letter or an underscore, but they can contain numbers later on in the name. JavaScript variables are also case-sensitive.
As in ActionScript, JavaScript variable types do not need to be specified when they are created and data types are converted automatically as needed.
JavaScript has several built-in data types:
- Boolean – a data type with only two possible values: true or false
- Null – a special data value that has no value and means nothing; not the same as zero
- Number – any series of numeric values, including integers and floating point numbers; can be expressed in decimal ( base 10 ), hexadecimal ( base 16 ), or octal ( base 8 )
- Object – built-in or user-defined classes of data; a collection of properties or attributes
- String – a series of alphanumeric characters, numbers, and punctuation marks
- Undefined – a special data value representing an absence of data; default value for variables declared without a value
When using integers in the Number data type, a leading 0 ( zero ) is used to specify that the integer is octal, and a leading 0x or 0X is used to specify hexadecimal. A floating point number can contain a either a decimal or an “e” to represent “ten to the power of” in scientific notation, or both.
Continued in:

