Year: 2010
House Model Almost Finished
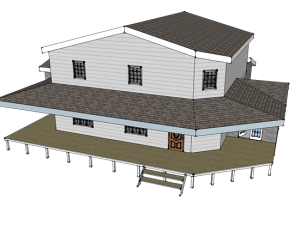
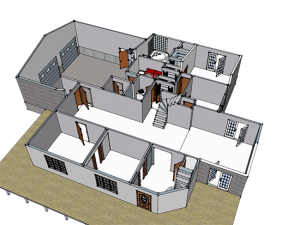
Posted on Categories 3d, Architectural DesignsI’ve almost finished my SketchUp model of my house design. I still need to add some interior doors in the upstairs rooms and add a few more of the windows. I also need to make all the interior walls and the exterior trim the right colors, and add the posts for the porch roof. Here are some images of the model at it’s current stage of construction:


Master of Architecture
Posted on Categories MiscellaneousI met with a counselor at the University of Utah yesterday to discuss entering the Master of Architecture program offered there. I’ve been thinking about pursuing my Master degree for a little while, but it wasn’t until a couple of weeks ago that I decided to look into an architectural program. Since I already have a Bachelor degree in something other than architecture, I would be required to enter the 3+ years graduate program instead of the 2-year program.
Since the application deadline was in January, I can’t enter the program until Summer 2011, which actually works out great because I have to take a semester of Calculus and two semesters of Physics before I can enter the program. I wasn’t required to take them for my Bachelor degree. I am also planning to take a course in drawing, and maybe a few others that will help me in this degree. I have never taken a course in drawing since I mostly do my artistic work on the computer, but the counselor said that hand drawings are weighed more heavily than digital art during the acceptance process.
I’ve also been researching other universities which offer this degree and some of them require me to take the Graduate Record Examination (GRE), so I guess I will be taking that sometime in the next year also.
Now I just need to figure out how to pay for all this…
Web Sites and 3d Models
Posted on Categories 3d, Architectural Designs, Freelance, Web designA couple more sites are online which I helped create. I can’t take credit for any of the designs on either of these sites, but I did some of the back-end coding for them. I wrote the HTML and CSS for www.sinceritybathandbody.com, and I created the Flash menu for www.loopdeloop.net.
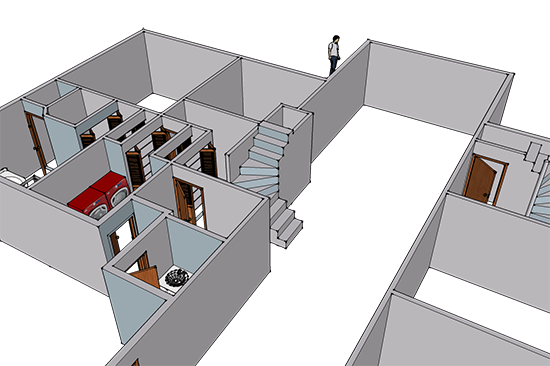
The last couple of weeks, I have been neglectful of my posts. I have been doing a lot of thinking and come up with a few ideas. I have also been working on a new set of house plans in Microsoft Visio which I have been turning into a 3d model using Google SketchUp. Here is a screenshot of the in-progress model:
Some Freelance Work Now Online
Posted on Categories Freelance, Web designThree Web sites for some of the freelance work I’ve been doing over the last couple of months are now online. I’m not sure how long they’ve been online, but I just became aware that they are.
One of the sites I worked on was www.poojakumar.com. It’s been modified a little bit since I did the work, but I wrote the initial HTML and CSS for the site.
I also did some work on www.workingbug.com. Each item in the Web site’s menu has a mouse rollover state, and I wrote the JavaScript to create the rollover states.
Another site I worked on was www.davidaarnold.com. I wrote the JavaScript to change the movie clips on the Stand-Up, Vlogs, and Television Appearances pages.
Adding ActionScript to Multiple Instances
Posted on Categories ActionScript, Flash, TutorialsI wrote a small snippet of ActionScript 2.0 the other day that I was quite proud of. It actually isn’t a very complicated block of code, but I was having trouble making a movieclip do what I wanted so I was quite pleased when I finally got it to work.
Here was my problem:
I had a movieclip, twenty-four frames long, with twenty-three buttons inside. When the mouse moved over each button, the movieclip was supposed to go to a different frame. I didn’t want to code each button individually because that can be tedious, so I employed a method I have often used to add the same code to multiple buttons. First I gave the timeline a name by assigning it to a variable:
var menus:MovieClip = this;
My buttons inside the movieclip were named btn1 through btn23, so I then created a for statement like so:
for (var i=1; i< =23; i++) {
t = menus[“btn”+i];
t.onRollOver = function() {
gotoAndStop(i+1);
}
t.onRollOut = function() {
gotoAndStop(1);
}
}
Using the temporary variables t and i, I was able to assign onRollOver and onRollOut functions to each button. The code actually worked really well when the mouse rolled off the buttons, but when the mouse rolled over the buttons, the movieclip always went to Frame 24 (23 + 1), no matter which button it was over. Obviously, this wasn’t going to work.
I tried several things to make the code work, and had no luck. For some reason, whenever I used the i variable in referencing the frame to go to, it only registered as being equal to 23. I had to figure out a way to capture the value of i at each iteration. Then it occured to me. Since i wasn’t working, maybe I could reference the object directly, using the instance name to tell the movieclip which frame to go to. That was easy enough to do using this._name, but I still had the problem of getting rid of the btn part of the instance names. That was when I remembered substring. I rewrote my code to convert the substring of each instance name to an integer, added 1, and it worked perfectly. My code now looked like this:
var menus:MovieClip = this;
for (var i=1; i < =23; i++) {
t = menus[“btn”+i];
t.onRollOver = function() {
gotoAndStop(int(substring(this._name, 4, this._name.length)) + 1);
}
t.onRollOut = function() {
gotoAndStop(1);
}
}
Creating a Basic Web Page
Posted on Categories HTML and XHTML, TutorialsThis tutorial is designed for Web design newbies, to instruct in the creation of a simple Web page. The file created in this tutorial will be used in future tutorials.
The first thing to know about Web site creation is that every Web page requires four things. These four things are an opening <html> tag, an opening <body> tag, a closing </body> tag, and a closing </html> tag. Actually, a web page will open just fine in a browser without any of these elements, but these are the four basic tags a Web page should have. The markup for a basic Web page looks like this:
<body>
</body>
</html>
Earlier, I mentioned the word ‘tag’. A tag is an HTML formatting element used to tell the browser how to format and display the information contained in the Web page. Most tags come in pairs, hence the need for an opening <html> tag AND a closing </html> tag. Exceptions to this rule include the line break tag, <br />, and the image tag, <image src=”someImage.jpg” />. Information that you wish to be formatted with a certain tag is placed between the opening and closing tags.
Let’s begin by creating the basic Web page mentioned earlier. To create the file, you will need an HTML or text editor. Notepad (Windows) works well, or you can also get software designed specifically for Web site creation. I prefer Adobe Dreamweaver, but if you want an inexpensive program the free tool HTML-Kit works well also. Many applications will automatically added things like the tags mentioned earlier, but in the interest of being thorough we’ll add everything manually.
Start with a blank document and save it as “index.html”. When a browser visits a Web address, the file it looks for is the file named index. If it is unable to find this file, the browser will display a file tree of the files in the directory on the Web server related to that Web address. Since you usually will not want users to be able to access your file tree, it is a good idea to place a file named index.html in every folder that will be visible to the Web. There are also other methods to prevent the file tree from showing, but this tutorial isn’t meant to be that exhaustive.
Now that your document is saved, we’re going to start adding things. The first thing we want to add to the blank page is the Document Type Definition (DTD) or doctype. Strictly speaking, the doctype is not required to create a Web page, but it IS required to create a well-formed Web page. The World Wide Web Consortium (W3C) defines several doctypes, but the one we will use for this example is XHTML 1.0 Transitional. Using the Transitional doctype allows us to not be as strict in our markup.
So now that we’ve added the doctype, our document should look just like this:
“https://www.w3.org/TR/xhtml1/DTD/xhtml1-transitional.dtd”>
Next, we add the opening <html> tag and a new tag called the <head> tag. The document head is a place where information is stored that will not be displayed on the actual Web page. There are a lot of different things that can go in the head, but the only thing we want to put for now is the Web page’s title. So we add an opening <title> tag, then the page title. We’ll call this page “My First Web Page.” Then we add a closing </title> tag, a closing </head> tag, and an opening <body> tag. Our markup should now look like this:
“https://www.w3.org/TR/xhtml1/DTD/xhtml1-transitional.dtd”>
<html>
<head>
<title>My First Web Page</title>
</head>
<body>
Once we have that, we just need to add some content to our page and close the <head> and <body> tags. Let’s add a paragraph that reads “I am learning to build Web sites and this is my first Web page.” To add a paragraph, we use another special tag, the <p> tag. So now we type: <p>I am learning to build Web sites and this is my first Web page.</p>, then type a closing </body> tag and a closing </html> tag. Your page should now look like this:
“https://www.w3.org/TR/xhtml1/DTD/xhtml1-transitional.dtd”>
<html>
<head>
<title>My First Web Page</title>
</head>
<body>
<p>I am learning to build Web sites and this is my first Web page.</p>
</body>
</head>
Now, just save your document and open it in a Web browser. Congratulations! You now know how to build a basic Web page.
